Showing posts with label crafts. Show all posts

Friday, May 29, 2015

My Paper Pumpkin #6

Hi!


It's been a while since I've posted about a My Paper Pumpkin project!  In case you haven't heard of it, My Paper Pumpkin is a monthly subscription box by Stampin' Up that includes everything you need to make a craft!  Many times it's a set of cards, but there have also been goody bags, gift boxes, and other fun things.  The kit I made last week was so cute!


This box included everything you need to make eight thank you cards with envelopes:

A cute set of clear stamps
Two ink pads (Pool Party and Daffodil Delight)


Pre-scored cards
Pre-scored envelopes
Eight sets of "Thanks" felt stickers
Adhesive strips
Bakers twine


The first thing I did was stamp each of the cards, which are long strips of white cardstock that you end up folding like an accordion.


You use the clear stamps in the kit (used with the clear block that comes with your very first My Paper Pumpkin box) to make a cute pattern on each section of each card!  I did the same patterns on each card, four starting with blue ink and four starting with yellow.


It was easier to stamp them when they were laying flat, so after I stamped them and I knew they were dry (which is pretty much right away), I folded them like an accordion.  

Then I stamped the "I just wanted to say..." on the first section of each card, using yellow ink on the blue triangles and blue on the yellow triangles!


Next I spelled out "Thanks" with the felt stickers on the next six sections of each cards.


The stickers were so fun!  I'll have to think of something cute to make with the outlines of the letters!


Next I stamped some designs on the envelopes.


Clear stamps are so fun because you can see exactly where you're stamping and line things up perfectly!

Then I used the adhesive strips to put the envelopes together.


Once they're put together, the envelopes are wide enough so the cards, which are thick because of the felt letters, fit in the envelopes perfectly.


The last step is to cut a 27" piece of string to wrap around the envelope twice and tie in a bow!


I loved this project and can't wait to use these adorable thank you cards!

If you love crafts, kits, cards, stamping, and getting a super fun box in the mail once a month that includes everything you need to make a very cute project, you will love My Paper Pumpkin!  Leave a comment with any questions you have about it!

Thanks for reading!

Tuesday, February 10, 2015

My Paper Pumpkin #4


Hello!


The other day I made the project that came in my January My Paper Pumpkin!  I still haven't done the project from my December box, but I did this one first because it's Valentine's Day-themed :)

If you've never heard of My Paper Pumpkin, which is made by Stampin' Up, read this post for more information.

The project from the January box is so cute!!  It has everything you need to make 24 little treat bags!


Here are the supplies that come in the box:

Punch-out pennants, hearts, and long rectangles
Cellophane bags
Glue dots
Pink with gold baker's twine
Real Red ink pad
Clear stamps (to use with the clear block that comes with your very first Paper Pumpkin)
Gold clips

First I stamped the punch out hearts with all of the cute sayings.


Then I attached two pennants to each heart using two glue dots (one to hold the two pennants together and one to attach that to the back of the heart).


Aren't they cute?  I mixed and matched the colors and sayings so they were all different.


After filling up a bag with cherry and cinnamon Jelly Belly jelly beans, I folded the punch-out rectangles (they are scored) over the folded top of the bag.


I held everything together, including a heart, with a gold clip.


The last step was to tie a bow on each clip using a 12" piece of string.


Aren't they so cute??  I love them!  They are really simple to make and really fun because there are so many cute combo options!


I've already given some to my improv group and I still have lots to give to other people!

Here are my previous Paper Pumpkin posts (pppppppp) if you're interested in seeing the other projects I've made!

September Box 2014
October Box 2014
November Box 2014 part 1
November Box 2014 part 2

Like I mentioned before, the info on how to sign up to get Paper Pumpkin for yourself is also in those posts!  If you like crafts and kits and making cute things, you will love this monthly subscription!

Thanks for reading!

Wednesday, December 3, 2014

My Paper Pumpkin #2

Hi!

About one month ago I wrote this post about a monthly craft subscription box from Stampin' Up called My Paper Pumpkin.  I just recently made my October box (a Thanksgiving project - they are usually a month early when they're holiday-themed, which is nice!) and it was so much fun to make!

This kit included everything you need to make this!


Isn't it cute??  They are little pie-shaped boxes that you can use to give gifts, to take home pie leftovers, or to decorate your table!  

Here are some of the supplies that came in this box.


The pie boxes came pre-scored and with peel-off adhesive to help put them together.  The wide ends of each box open and close.


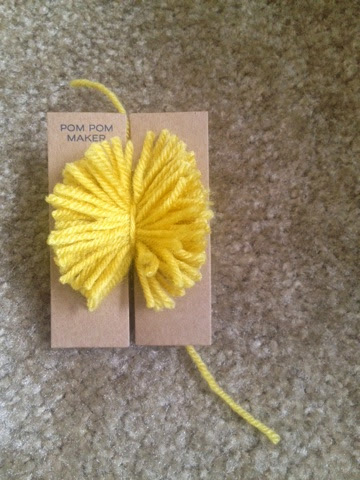
The box also included eight cardboard pom pom makers, which are shaped like the letter H.  To make a pom pom, you wrap almost the entire amount of yarn (they had the yarn pre-measured into eight bundles) around the cardboard, then use a shorter piece to tie around the bundle very tightly (going into the slits).


Then you cut through the looped yarn, and...


...tear the cardboard pom pom maker off!  Ta-da!  Aren't they so cute?  You trim the pom poms so they're even.


Using the clear stamps and the ink included in this box, along with the clear block you receive in your first Paper Pumpkin, you stamp cute sayings onto the white stickers that you put on the wide ends of each pie slice.  You use the smaller adhesive dots to stick the cute punch-out feathers onto the boxes (I curled them a little bit around my finger), and then use larger adhesive dots to stick on the pom poms!


I kept the whole pie and used it to decorate our apartment since we don't have that many Thanksgiving-themed decorations!  I had so much fun making this project and I loved learning how to make pom poms!

I recently received my newest Paper Pumpkin and the projects are very cute!  I will post all about it once I make everything!

Thanks for reading!

Wednesday, October 22, 2014

My Paper Pumpkin

Hi!

Today was another rainy, cloudy day!  I stayed inside all day but I got a lot done!  I got a package in the mail from my mom that had a bunch of fun Halloween stuff in it - two sets of clear stamps to make cards, etc, cute paper, and some other stuff!  I made a ton of Halloween cards and envelopes!  So much fun :)

Speaking of cute Halloween crafts, I have to write about my Paper Pumpkin!  It's a monthly subscription box ($20 a month including shipping) from Stampin' Up that comes with everything you need to make a specific project!  It might be a set of cards, cute gift bags, something to decorate your house, or another cool craft!  My mom is a Stampin' Up demonstrator and she's gotten Paper Pumpkin for a while.  I've gotten to do a lot of the projects with her and they are all so fun!  They come with instructions, but you can also watch tutorial videos online or make the project your own way!

October was my first month to get a box and the project is these adorable burlap goody bags!  Since this was my very first box, it also came with a clear block to use with the clear stamps that come with this box and many upcoming boxes.  It really does come with everything you need (except double stick tape...you may need that sometimes)!

This kit came with six burlap bags - three with polka dots and three with stripes, different shapes of punch-out cards, little stickers of bats, skulls and cross bones, etc, mini clothes pins - three purple and three orange, black string to tie the bags closed, a string of orange sequins, 3D foam adhesive stickers, a set of stamps, and an orange ink pad!


Here are three of my bags completed.  Aren't they so cute??


I'm going to fill them with candy and give some to the girls that work in the office at our apartment!  I just got my second box a few days ago, so when I make that project I will post about it!

Let me know if you have any questions!  If you want to subscribe (you can cancel at any time and you can opt out of a month), click here and follow the instructions.  When it asks you if you have a demonstrator, if you don't already have one, you can put my mom!  Her name is Sara Contevita and if you need the state, put AZ.

Tonight we had the yummy cauliflower recipe I've posted last month!

Thanks for reading!